Over time, all homes experience some form of wear and tear. Ceilings are no exception. Cracks, water damage, or outdated textures detract from a room’s appeal and can pose safety hazards.
Ceiling Repairs Perth are vital processes that breathe new life into a space and create a refreshed, captivating interior. Addressing these issues prevents further problems, from repairing plaster to patching drywall.
Cracks in walls and ceilings can range from minor cosmetic problems that are easily patched to serious structural concerns that require the attention of a professional. It is important to know how to identify different types of cracks in order to determine the severity of the problem and the appropriate course of action. Whether it is due to a sudden shift in the temperature, water damage, or an issue with the foundation, cracks in your home’s ceiling can be a red flag for more significant issues that must be addressed immediately.
One of the most common types of ceiling cracks is a hairline crack. These cracks are typically caused by a buildup of moisture or changes in the climate that cause expansion and contraction in drywall and plaster. Hairline cracks may not be a concern, but they should still be repaired to prevent the cracks from widening over time.
Another common type of ceiling crack is a straight crack. These cracks are often caused by the natural settling of your house or by the uplift of roof trusses. Cracks in drywall and plaster can also be caused by water leaks, heavy items falling on the ceiling, or poorly installed drywall.
A discolored crack on the ceiling is usually a sign of a water leak. If the cracks are accompanied by other symptoms of a leak, such as mold growth or stains on the ceiling, it is recommended to consult a plumber to determine the source of the leak.
Structural cracks in your ceiling are the most serious type of damage and should only be handled by a professional. If left unattended, these cracks can lead to the collapse of your entire ceiling and pose a health hazard for you and your family.
If you decide to tackle this project yourself, it is important to prepare for the repair process by laying down a tarp or piece of plastic in the room where you will be working to catch any debris and dust that may fall during the repair. Also, be sure to set up a ladder that is sturdy and high enough to reach the area you are working on.
Determine the Severity of the Cracks
Cracks in a home’s ceiling can range from minor cosmetic issues to structural damage that requires the attention of a professional. There are several things you should look for when determining the severity of your ceiling cracks, including their shape, size, and location.
Hairline cracks in the ceiling are fairly common and usually not a cause for concern. They may result from changes in temperature or the settling of the foundation. Cracks that are widening over time should be inspected by a contractor as they can indicate serious structural damage. Cracks that extend down to the walls are another cause for concern as they may indicate a leak in the roof or some other problem.
Moisture and water damage can cause cracking in the ceiling, especially if it is caused by a leaky roof or a leaking pipe. In this case, it is important to locate the source of the leak and fix it immediately. Cracks that are discoloured or spotted with water are also a sign of moisture damage and should be addressed by a professional as soon as possible.
Structural cracks in the ceiling can be caused by a variety of issues, such as foundation settlement or structural damage from heavy weight on the roof and walls. They can also be caused by earthquakes, landslides, and sinkhole problems. If your ceiling cracks are causing sagging in the house, this is a sign of serious structural damage and should be inspected by a professional as soon as possible.
It is also a good idea to examine the history of the house. Has it had serious flooding or other structural issues in the past that could have contributed to the ceiling cracks? It is a good idea to have a qualified and experienced contractor inspect the cracks as early detection can save you time and money. They can help you determine the cause of the cracks and recommend a repair plan. They can also provide a free inspection and estimate. Contact Epp today for more information. We are proud to serve clients throughout the Twin Cities and surrounding areas.
Repair the Cracks
A ceiling crack may be a simple cosmetic problem or it can be a sign of structural problems that require professional attention. The first step in repairing the cracks is to inspect them to determine their severity and what caused them. Then, the cracks can be repaired appropriately. If the cracks are accompanied by sagging, then this is a sign of serious structural problems that need to be addressed immediately.
Cracks in the ceiling can be patched with drywall joint compound or Spackle, but only if the cracks are thin. If the cracks are wide and/or if they have grown over time, then it is best to use a drywall repair kit that includes a utility knife, five-in-one tool, and small tub of premixed joint compound, along with mesh or paper tape.
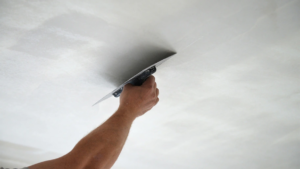
In order to patch the cracks, it is necessary to scrape away any loose paint or drywall compound from the area. Then, the cracks should be sanded to give them a smooth surface. The next step is to add the joint compound or Spackle to the area and spread it around the crack. After that, the mesh or paper tape should be applied to the wet joint compound and pressed into place. Then, the cracks should be lightly sanded again to give them a smooth finish and prepare them for a fresh coat of drywall paint.
When it comes to painting the cracks, it is important to choose a color that matches the existing paint so that it blends in and doesn’t stand out. If you don’t have any leftover paint, it is possible to purchase a matching color from a home-supply store or a larger hardware store. It is also possible to bring a sample of the paint to the store and have it matched with an on-site computerized system. It is also important to consider whether or not the cracks are affecting the cornice work or a ceiling rose when deciding on how to proceed. Lastly, the cracks should be re-inspected periodically to ensure that they are not becoming worse or causing additional damage.
Seal the Cracks
While a few cracks in the ceiling are usually no reason to panic, large areas of drywall damage may require professional ceiling repair. A ceiling repair project of this scope is usually best handled by a licensed and insured general contractor with extensive experience in handling residential construction projects.
During the crack repair process, any plaster loose from the ceiling should be scraped away and cracked edges made smooth. Then, the cracks should be widened to 1/4 an inch to hold a sufficient amount of patching compound. Next, the cracks should be covered with mesh tape to make a solid and durable repair. Once the tape is in place, a thin coat of joint compound should be applied over it. After it dries, it should be sanded down and then primed and painted to match the existing ceiling paint.
Large cracks in the ceiling can be a sign of structural damage to the house or even a collapsed support beam. If you suspect the problem is serious, contact a licensed foundation repair company or general contractor for a professional inspection.
Another indication that it’s time for ceiling repairs is discoloration of the plaster. This can indicate a leak in the roof or near the crack, and it’s important to find and fix the source of the leak before it gets worse.
A good ceiling repair plan includes regular inspections of the entire ceiling for signs of wear and tear, including cracks, plaster damage and water stains. By catching problems early and following up with a repair, you can minimize the cost of ceiling repair in Keller.
Before beginning a DIY ceiling repair project:
- Make sure you have enough room to set up a ladder and work safely.
- Place a tarp or piece of plastic on the floor to catch dust and wet compound drips.
- Move any furniture out of the way, and don a face mask and safety goggles to protect yourself against breathing in dust from sanding drywall compound.
- Ensure that you have a stable A-frame ladder and know how to use it properly to reach the ceiling.